
Condensed Version:
*step by step version with me rambling below the shorten recipe!*
Ingredients:
> 3 cups of plain white flour
> 1.5 to 2 cups of warm water
> 1.5 tsp of active/instant dry yeast
> 1 tsp of white sugar (optional, but this will give the yeast something extra to feed on and will make the bread fluffier)
> 1 tsp of salt
> 2 tbsp of olive oil (1 tbsp to be added to the mixture, the other to rub on the dough)
> Seeds to sprinkle on top (optional)
Steps:
> In a bowl, mix the dry ingredients together, including yeast.
> Pour in 1 tbsp of olive oil and slowing pour in warm water, you may need less water than 2 cups. Combine with hands, until there are no flour spots. Mixture should not be super wet or dry
> Rub 1 tbsp of olive oil on dough and around inside the bowl
> Cover with tea towel for a minimum 12 hours
> Take dough out of bowl and line baking tray with flour
> Place “sticky” side of the bread onto the tray
> Pull edges to the middle
> Flip dough
> Add seeds on top (optional)
> Cut dough, about 1/3 deep
> Place in cold oven and turn temperature to 180-200 degree Celsius
> Bake until brown, and until bread sounds hallow when you tap it with a spoon
> Take outside of oven and leave on cooling rack for 30 mins
> Eat!
Recipe and Ramblings – Plus step by step guide including photos:
There really is nothing quite like freshly baked bread.
When we moved to a new place almost a year ago, the rent was cheap – but with cheapness you miss out on a few things like a decent oven. I didn’t think it was a big thing until I realised the oven was barely functional, so when it finally broke down, we got a new one which meant I could finally bake again! It’s funny, I didn’t realised how much I liked random baking until I didn’t have the equipment to do so. Ever since the oven got replaced, I’ve been baking and roasting up a storm to make up for lost time.
I make bread every week and it’s so ridiculously simple that you’ll probably be think: why didn’t I ever make my own bread????
It’s almost impossible to stuff up and you don’t need to knead anything!

You do need to wait at least 12 hours.

But sliced homemade bread!

Before you begin, you do need yeast, I just bought a big can of yeast that I freeze. It lasts a really long time and it’s better than buying those tiny sachets. So not completely zero waste. But you’ll get so many uses out of this can.

Ingredients:
**3 cups of plain white flour
1.5 to 2 cups of warm water
1.5 tsp of yeast
1 tsp of white sugar (optional, but this will give the yeast something extra to feed on and will make the bread fluffier)
1 tsp of salt
2 tbsp of olive oil (1 tbsp to be added to the mixture, the other to rub on the dough)
Seeds to sprinkle on top (optional)
** I use white flour, for the “fluffiest” results. But I’ve also used a combination of the following:
>1 cup of wholemeal, 2 cups of white flour = slightly chewier but a little bit more wholesome. Still fluffy, but obviously not as much as all white flour. I added 2 tsp of yeast to give it a little bit more rise
>2 cups of wholemeal, 1 cup of white flour = chewier. Still a little bit fluffy. I added 2 tsp of yeast to give it a little bit more rise
>3 cups of wholemeal = like proper wholemeal bread, it’s definitely chewier. It’s better for you, but I only make this sometimes. I like a bit of fluff with my bread, ya know? (Add 2 tsp of yeast)
In a large bowl, mix the following together:
Flour
salt
sugar
yeast
Add tbsp of olive into the mixture and slowly pour in the warm water. I mix with my hands – you will get better feel this way. You might need to use two cups (particularly if you pack your flour), but most of the time 1.5 cups is fine. It shouldn’t be too dry or super wet. There shouldn’t be any dry spots.

Needs a little splash of water. But not much more, it shouldn’t look “dry”
I rub a tbsp of olive oil on the dough and inside the bowl. It’s helps a little when trying to get the dough out the next day.
Cover your bowl with a tea towel, I reuse an old ribbon I had to tie around the bowl, but use whatever you have.

Set aside for a minimum **12 hours. I tend to make the mixture on a Friday night and bake on Saturday morning. What’s better than freshly baked bread after a long week of work???
** 24 hours = the bread is slightly chewier. It’s still good!
**48 hours = yes! I’ve left the bread to do it’s thing for TWO DAYS! It’s still good. It kinda reminded me of sourdough, but not quite like fancy-pants sourdough.
I did have an issue one time (I’ve made this recipe over 20 times now), when the mixture was a little too dry. It developed a “crust” after 24 hours – if this happens to you, it’s still okay! Just remove it and bake, it’s all gravy…or in this case bread!
After 16 hours of sitting around.

I use a knife to get the dough out of the bowl. It will be sticky – sticky is good! You do need to be gentle with it, but it’s okay if you man-handle it a little. Your dough will still be fine.
Line your baking tray with flour.

Place the “sticky” side of the dough on the tray and gently fold the edges together.

Place the folded edges onto the pan.

Add seeds if you want to. I tend to use sesame seeds (black and white) and poppy seeds. Cut a line in the middle. Make sure it’s sorta deep. Maybe 1/3 the way through. This will help the bread rise.

I place the bread in an cold oven and bake at 180-200 degrees celsius (I have no idea what this is in fahrenheit!!). I bake until it’s brown and when I tap on the bread it sounds “hollow”.

I let it sit on a cooling rack for about 30 mins – don’t cut it straight out of the oven, even if you want it too!
Use a serrated (or bread) knife to cut the bread.
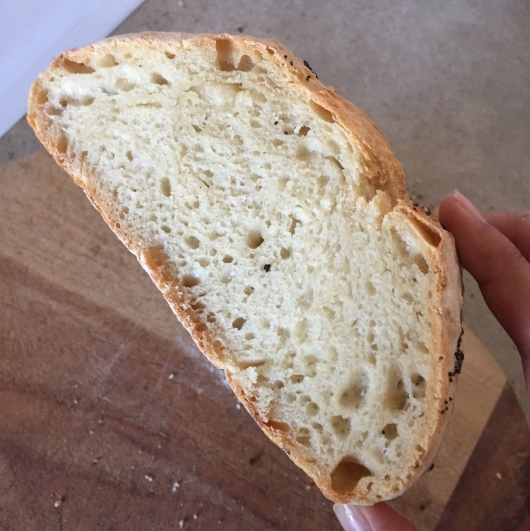
The bread normally disappears in 3-4 days. And on the second day we start eating the bread as toast. If you want to freeze the bread, I recommend cutting it up into slices before freezing!
Anywho enjoy – and feel super fancy with your “artisanal” bread


can the same batch of dough be split into smaller mini-loaves? or would that mess up the baking time /:
LikeLike
I’ve made mini loaves out of these before, but the baking time is shorter! I mostly don’t time my baking anymore and just go by feel, or in this case, if it sounds hollow then it’s done!
LikeLike